Sit-stand desks introduce a cable management challenge that fixed-height desks don't face: your cables must move cleanly through a vertical range without pulling tight when the desk rises or pooling on the floor when it lowers. Every power cord, monitor cable, USB connection, and Ethernet line must accommodate this motion, or you risk snagging, stress on connectors, and a tangled mess that defeats the purpose of an organized workspace.
This guide is for anyone working with a height-adjustable desk and multiple peripherals - monitors, laptops, keyboards, phones, chargers, and external drives. Whether you're setting up a new desk or troubleshoding an existing one, the strategies here will help you route cables with enough slack for full range of motion, secure them to prevent sagging and swaying, and choose organizing products that work with vertical travel rather than against it.
We'll walk through routing strategy to plan cable paths before you plug anything in, securing methods that keep cables controlled without restricting movement, and product options that suit different desk sizes and equipment loads. The goal is a setup that transitions smoothly between sitting and standing height, with cables that stay out of sight and out of the way at every position.
Who This Guide Is For
This guide is designed for anyone using a sit-stand desk who struggles with cable tangles, desktop clutter, or tension when adjusting height between sitting and standing positions. If your monitor cables snag on the desk frame, power cords pull equipment off the desk, or you avoid height changes because of the mess beneath, the strategies here will help you route, secure, and organize wiring more effectively.
The advice is especially relevant if you work with multiple monitors, a docking station, external drives, desk lamps, or other peripherals that multiply the number of cables running to your workstation. New standing desk owners setting up their workspace for the first time will also find this guide useful for building good cable-management habits from the start.
This guide does not cover fixed-height desks, where cables can be permanently secured without accounting for movement, or fully wireless setups with no wired peripherals. The focus is exclusively on managing the dynamic cable challenges created by frequent or occasional height transitions at a sit-stand desk.
What Matters Most in Sit-Stand Cable Management
Effective sit-stand cable management depends on five core principles that ensure your cables move reliably through the desk's full height range without snagging, tangling, or limiting motion. Most sit-stand desks travel 24 to 30 inches vertically, and every cable must accommodate that range while staying organized and accessible.
First, provide adequate slack. Measure the desk's total vertical travel and add at least 6 to 8 inches of extra cable length to allow smooth motion without tension. Cables pulled tight at maximum height will eventually strain connectors or pull equipment off the desktop.
Second, secure cables to the desk frame, not the desktop. The frame remains stationary while the desktop moves, so routing cables along the frame and using fixed mounting points prevents the entire bundle from rising and falling with each adjustment. This keeps cables stable and reduces horizontal sway.
Third, manage horizontal movement. Even with proper slack, cables can swing or drift sideways during height changes. Use cable clips, trays, or guides at multiple points along the frame to keep bundles aligned and prevent them from catching on chair arms or legs.
Fourth, separate power and data cables when layout permits. Bundling AC power cords tightly alongside USB, video, or network cables can introduce interference in some setups. Running them in parallel tracks a few inches apart reduces this risk without complicating the install.
Fifth, maintain accessibility for reconnections. Avoid permanent fasteners or tight wraps that make it difficult to swap a monitor cable or add a new device. Use reusable Velcro straps or cable sleeves that open easily, and leave enough working length near connections to unplug without dismantling the entire run.
These principles apply whether you choose a simple J-channel, a cable spine, or a full under-desk tray system. The goal is always the same: cables that follow the desk's movement without creating new friction, noise, or wear over hundreds of height cycles.
Pre-Setup Checklist
- Measure your desk's full height range (lowest to highest position)
- Inventory all cables: power, USB, monitor, peripherals
- Identify cable entry and exit points (wall outlets, desktop devices)
- Check cable lengths - ensure each has at least 6 inches of extra slack beyond vertical travel
- Locate attachment points on desk frame (underside rails, legs, crossbars)
- Confirm desk is at lowest position before installing management hardware
Routing Strategy: From Wall to Desktop
The most reliable cable routing path runs in three stages: a vertical climb from the wall outlet to the desk frame, a horizontal run along the underside of the desk, and a controlled loop of slack before cables surface to your devices. This segmented approach isolates movement to the vertical section during height transitions, keeping the horizontal and desktop portions stable and predictable.
Start by securing cables to a desk leg or nearby fixed furniture using adhesive clips or hook-and-loop straps spaced every eight to twelve inches. This vertical section should have minimal slack - just enough to prevent tension when the desk is at maximum height. At the transition point where cables meet the underside of the desk, route them into a cable tray, basket, or spine running parallel to the back edge. This horizontal run keeps power cords, display cables, and USB lines grouped together and out of sight while preventing them from hanging below the desk frame where they could catch on chair arms or knee strikes.
The final stage is a deliberate service loop: leave six to ten inches of slack coiled neatly where cables exit the tray and rise to each device. For a single monitor setup, this loop sits directly behind the display. With dual monitors or a docking station, create individual loops for each cluster - one for the monitors, one for the dock, and a smaller one for peripherals like a webcam or desk lamp. This separation prevents cables from tangling during height changes and makes it easier to swap devices or troubleshoot connections without disturbing the entire bundle.
If your desk has a grommet hole or cable port, route the service loops through it to keep the desktop surface clean. For setups without built-in ports, use a small cable sleeve or clip at the rear edge to guide cables upward in a single exit point. Place docking stations and power strips near the back corner of the desk to minimize the length of desktop cables, reducing visual clutter and the risk of snagging. This routing strategy adapts to both simple single-device setups and complex multi-monitor workstations, maintaining predictable cable behavior across the full height range of the desk.
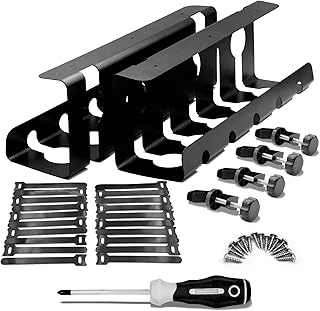
2Pcs 15.75 Inch Gaming Cable Management Standing Desk Wire Organizer Basket
The 2Pcs 15.75 Inch Gaming Cable Management Standing Desk Wire Organizer Basket offers a compact solution for managing cables on smaller sit-stand desks or setups with a modest number of cables. Each basket measures the listed size in length, making the pair well-suited for desks under the listed size wide where a single long tray would extend beyond the frame or create unnecessary overhang.
The rigid basket construction provides enough structure to hold slack loops of power cables, monitor cables, and USB lines without sagging during height transitions. The open wire design allows you to feed cables in and out from multiple points along the length, and the basket sides keep bundled cables contained without requiring additional clips or ties. Mounting typically involves brackets that attach to the underside of the desk frame, positioning the basket low enough to keep cables out of the way while remaining accessible for adjustments.
This two-basket approach works well when you have distinct cable zones - one basket near the power strip and another near your monitor or docking station - but it introduces a gap between the two units. If you run cables from one basket to the other, those midpoint cables will hang exposed unless you add a secondary management solution. For users with ten or more cables, or those running thick bundles of power and data lines, the 15.75-inch length per basket may not provide enough capacity, forcing cables to stack vertically or spill over the edges. Longer single-piece trays offer continuous coverage and eliminate the gap, making them more practical for high cable counts or desks where cables cluster in the center rather than at the edges.
At $23.99 for the two-piece set, the basket offers reasonable value for smaller desks or streamlined setups. The rigidity and slack-holding design work well for maintaining cable loops during height changes, but the limited length and divided coverage mean users with more cables or wider desks should consider longer continuous trays instead.
- ✅ Compact 15.75-inch length per basket suits desks under 48 inches
- ✅ Rigid construction holds slack loops without sagging
- ✅ Two-piece design allows placement in distinct cable zones
- ✅ Open wire sides permit cable entry and exit at multiple points
- ⚠️ Gap between baskets leaves midpoint cables exposed
- ⚠️ Limited length per basket may not accommodate high cable counts
- ⚠️ Less practical for wide desks or centrally clustered cable runs
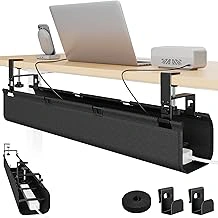
PEGZONE 31.5" No Drill Under Desk Fabric Cable Management Tray
The PEGZONE 31.5" No Drill Under Desk Fabric Cable Management Tray offers a tool-free installation option for renters or anyone avoiding permanent modifications to their sit-stand desk. Priced at $26.99, this fabric tray attaches with velcro or adhesive mounting, eliminating the need for screws or drilling into desk surfaces.
The flexible fabric construction accommodates varying cable volumes and adapts as you add or remove devices. At the listed size in length, the tray provides adequate coverage for standard-width desks, keeping power strips, adapters, and loose cables contained and out of sight. The fabric material allows cables to enter and exit at multiple points along the length, which can be useful when routing to peripherals at different positions.
Because the tray uses soft fabric rather than a rigid metal basket, it offers less structural support for heavy power bricks or densely packed cable bundles. Overloading the tray may cause visible sag, particularly in the center span. The adhesive or velcro attachment also means weight capacity is limited compared to screw-mounted alternatives, so distributing heavier items toward the edges or using additional support points helps maintain stability during height transitions.
For sit-stand desks that move frequently, confirm the adhesive maintains hold under repeated motion and check periodically for any loosening. The fabric design makes it easy to reposition or remove without leaving permanent marks, which is valuable when desk layouts change or when moving to a new workspace. This tray works well for light to moderate cable loads where reversibility and ease of installation are priorities over maximum load capacity.
- ✅ Tool-free installation with velcro or adhesive mounting
- ✅ 31.5-inch length covers standard desk widths
- ✅ Flexible fabric allows cables to enter and exit at multiple points
- ✅ No permanent modifications or drill holes required
- ✅ Easy to reposition or remove without surface damage
- ⚠️ Less rigid structure than metal baskets
- ⚠️ May sag in the center with heavy power bricks or dense cable bundles
- ⚠️ Adhesive attachment limits overall weight capacity
- ⚠️ Requires periodic checks to ensure adhesive holds under repeated desk motion
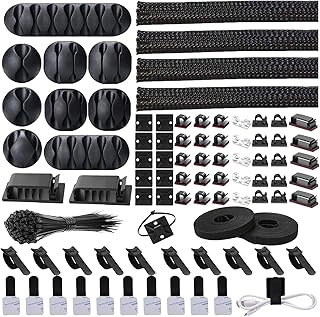
Cord Management Organizer Kit with Cable Sleeves, Clips, and Ties
The Cord Management Organizer Kit with Cable Sleeves, Clips, and Ties offers a bundling approach for users who prefer visible but tidy cable runs along desk legs, frames, or vertical surfaces. This kit combines neoprene sleeves to group multiple cables together with adhesive clips that mount directly to the desk structure, creating organized vertical or horizontal paths that move cleanly during height transitions.
The sleeves accommodate varying cable diameters and can be trimmed to the exact length needed for monitor cables, power cords, and USB lines. Adhesive clips attach to desk legs or the underside of the work surface, holding the sleeve or individual cables in place without drilling. This surface-mounting strategy works well for setups where you want quick access to individual cables or need to add and remove devices frequently - power bricks, charging cables, and peripherals stay bundled but remain easy to reach.
Compared to cable trays that hide wires completely beneath the desk, this organizer kit keeps cables partially visible along the frame. That visibility makes troubleshooting and reconfiguration faster, though it may not suit minimalist aesthetics as cleanly as a fully concealed tray. The adhesive clips provide moderate hold; desks with textured or porous leg finishes may require additional adhesive or screw-mount alternatives for long-term stability under the weight of thicker power cables.
This kit suits users who prioritize accessibility and flexibility over hidden cable runs. If you regularly swap devices, test equipment, or adjust your peripheral layout, the sleeve-and-clip system allows changes without reaching under the desk or disassembling a tray. For static setups where cables rarely change and a completely clean underside is the goal, a metal basket tray or spine offers a more permanent concealment solution.
The included ties let you secure slack loops at intervals along the sleeve, preventing sag between clip points during repeated height adjustments. Plan clip spacing every the listed size along vertical runs to maintain tension and keep bundles from pulling away from the desk frame. Use the sleeves for main runs and reserve individual clips for lighter cables that branch off to peripherals on the desktop.
- ✅ Sleeves bundle multiple cables into tidy vertical or horizontal runs
- ✅ Adhesive clips attach to desk legs or frames without drilling
- ✅ Quick access for troubleshooting or reconfiguring devices
- ✅ Trimmable sleeves adjust to exact cable run lengths
- ✅ Included ties secure slack and prevent sag between clip points
- ⚠️ Cables remain partially visible along desk frame
- ⚠️ Adhesive hold may weaken on textured or porous leg finishes
- ⚠️ Requires more clip points than enclosed tray solutions to prevent sag
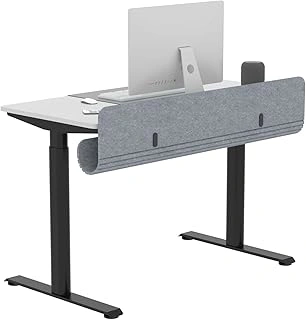
ERGO COLLECT 47.2" Felt Under Desk Cable Management Tray with Tablet Slot
Wide sit-stand desks - the listed size and up - often outgrow standard multiple- or larger cable trays, leaving slack to droop at the edges or forcing you to mount multiple shorter units. The ERGO COLLECT 47.2" Felt Under Desk Cable Management Tray with Tablet Slot covers nearly the full width of these surfaces, keeping power strips, adapters, and charging cables contained in one continuous run. The felt construction dampens vibration and reduces the rattle that metal trays can produce during height changes, and the integrated tablet slot lets you stow an iPad or e-reader within reach without claiming desk-top real estate.
At $56.99, this tray sits at the upper end of the cable-management price spectrum. That premium buys you length - at the listed size, you reduces mid-desk cable drops and reduce the number of adhesive clips or straps needed to bridge gaps. The felt material is softer on cable jackets than rigid plastic, so repeated adjustments are less likely to abrade insulation over time. The tablet slot is a practical bonus if you use a secondary screen for reference documents or prefer a dedicated holder for a drawing tablet, though it does reduce usable cable depth by an inch or two in that section.
This tray makes the most sense when your cable count is high - eight or more devices - or when your desk width approaches the listed size and shorter trays leave visible sag. If your setup includes only a laptop, monitor, and keyboard, a larger option will handle the load at half the cost. But for multi-monitor workstations, docking stations with external drives, and accessory-heavy creative rigs, the full-width coverage simplifies routing and keeps everything off the floor during the desk's lowest setting. Mount the tray so its front edge sits two to three inches behind the desk's rear edge; this offset helps reduce the chance of cables from pulling taut when you raise the desk to standing height.
The 4.2-out-of-5 rating reflects solid construction and reliable adhesive backing, though a few users note that heavier power bricks can cause slight sagging in the center if the tray isn't mounted to a reinforced rail or if the felt stretches over time. Adding a mid-span screw or zip-tying the tray to the desk frame at the quarter-points distributes weight and keeps the profile flat. For desks the listed size or wider with a dense cable load, the ERGO COLLECT tray offers one-piece coverage that quiets movement and doubles as accessory storage; for narrower or lighter setups, shorter trays deliver comparable function at a lower price.
- ✅ 47.2-inch length covers wide desks without mid-span gaps
- ✅ Felt material dampens vibration and noise during height adjustments
- ✅ Integrated tablet slot provides accessible storage for secondary screens
- ✅ Softer on cable jackets than metal or hard-plastic trays
- ⚠️ $56.99 price is high compared to shorter alternatives
- ⚠️ Center sag possible with heavy power bricks unless reinforced mid-span
- ⚠️ Tablet slot reduces usable cable depth in that section
How to Secure Cables During Height Transitions
Securing cables during height transitions prevents snagging, yanking, and equipment damage when your desk moves between sitting and standing positions. The goal is to allow vertical movement while controlling horizontal sway and eliminating tension at connection points.
Use reusable velcro ties or cable clips at regular intervals along the cable run - typically every 12 to 18 inches - to bundle cables together and reduce lateral movement. Attach these ties to the desk frame or leg structure, never to the desktop surface or monitor arm, since those components move independently and will pull cables in unpredictable directions.
Create intentional slack loops between attachment points to absorb the distance change as the desk rises and falls. A gentle U-shaped or J-shaped loop gives cables room to extend without pulling taut, while the velcro ties keep the loop from swinging freely. The slack should be visible but not excessive - just enough to accommodate the full height range without dragging on the floor at the lowest setting.
Before tightening any ties permanently, run the desk through its complete height range at least twice. Watch for cables that become taut, twist, or pull at connectors. If a cable shows tension, add more slack or reposition the attachment point closer to the frame's vertical path. Avoid over-tightening velcro ties, which can compress cables and restrict their ability to flex during movement, and never secure cables to moving parts like the motor housing or crossbar joints.
The most common errors are using too little slack, which risks connector damage, and securing cables to the underside of the desktop, which forces them to travel the full vertical distance without support. By anchoring to the stationary frame and building in controlled slack, cables move predictably and stay organized through thousands of height adjustments.
Common Mistakes to Avoid
Even careful cable plans can fail if you repeat a few common setup errors. Recognizing these pitfalls before your desk is fully loaded will save hours of frustration and prevent damage during height transitions.
Insufficient slack at standing height is the most frequent mistake. Cables routed snugly when the desk sits at its lowest position will pull taut - or unplug entirely - when you raise it to full standing height. Always lift the desk to maximum height first, then secure cables with at least two to three inches of extra loop at the highest point. This small margin absorbs movement and keeps connectors seated.
Attaching cables to the desktop or monitor-arm pole instead of the frame creates tension every time the desk moves. Desktop-mounted clips travel with the surface, forcing cables to stretch or tug against fixed wall outlets. Secure power strips, sleeves, and guide clips to the underside of the frame or fixed leg columns so cables can follow the desk's motion without stress.
Bundling power and data cables tightly together invites electromagnetic interference, especially when high-current power bricks sit against USB or Ethernet runs. Keep AC power cables in a separate channel or sleeve, spaced at least an inch away from low-voltage signal wires. Use individual Velcro straps rather than a single zip-tie to allow easy repositioning and airflow.
Applying adhesive clips or cable raceways to textured metal frames often leads to peeling within days. Textured powder-coat finishes reduce bond strength, and the weight of bundled cables accelerates failure. Choose screw-mount clips for textured surfaces, or wrap rubberized tape around the frame first to create a smooth bonding surface for adhesive-backed organizers.
Failing to test the full height range before finalizing means discovering snagged cables or loose connections only after your workspace is complete. Raise and lower the desk slowly through its entire travel at least twice, watching for any cable that tightens, drags, or catches on furniture. Adjust slack and reposition clips immediately - small tweaks now prevent unplugged monitors or damaged ports later.
By avoiding these five errors and verifying each fix across the desk's full range of motion, you ensure smooth, reliable height transitions and a cable layout that remains tidy over months of daily use.
Maintenance and Adjustments
Cable management on a sit-stand desk requires periodic attention as cables settle, devices are added or removed, and routing hardware accumulates dust. After the initial installation, cables may shift or sag as adhesive strips cure and sleeve tension relaxes, so check slack and adjust ties within the first two weeks to ensure smooth height transitions.
When you add a new device or swap a monitor, re-route the new cable through existing trays or sleeves and confirm that no loop hangs low enough to snag on the desk frame at full standing height. Remove any unused cables entirely rather than bundling them out of sight, since extra weight and bulk increase the chance of interference. Velcro ties and reusable cable straps wear over time - if a strap no longer grips or shows fraying, replace it to maintain secure routing.
Dust and debris collect inside cable trays, baskets, and horizontal runs, especially in floor-level power strips and under-desk channels. Every three to six months, wipe trays with a dry microfiber cloth and vacuum around power strips to prevent buildup that can trap heat or obscure label visibility. A quarterly review cycle works well for active setups: raise and lower the desk fully, inspect all attachment points, tighten any loose zip ties or clips, and verify that each cable still follows its intended path without excess slack or tension.
Keeping a small bag of spare velcro ties, adhesive cable clips, and zip ties in a desk drawer simplifies quick fixes and ensures that minor adjustments do not turn into prolonged clutter. Routine checks prevent small routing problems from compounding into tangles, preserve the lifespan of cables and connectors, and keep your workspace both functional and visually clean as your setup evolves.
Final Takeaway
Effective cable management on a sit-stand desk starts with understanding vertical travel and creating enough slack to accommodate the full range of motion without sagging or pulling. Measure the distance between your lowest and highest positions, then add a comfortable buffer - most setups need 6 to 10 inches of extra cable length to prevent tension during transitions. Secure cables to the desk frame or legs using clips, sleeves, or cable trays so they move with the desk rather than hanging loose or catching on furniture below.
The goal is not to eliminate cables entirely, but to route and organize them in a way that prevents snagging, reduces visual clutter, and maintains safe, repeatable height adjustments. Use velcro straps or reusable ties to bundle groups of cables together, and anchor bundles at key points along the frame to guide movement. Test the desk through its entire range before finalizing placement - you should see gentle curves in the cables, not taut lines or drooping loops.
Start with the basics: power cables and monitor connections first, then peripherals. You don't need a perfect setup on day one. Incremental improvements - adding one more clip, rerouting one cable at a time, or swapping a rigid sleeve for a flexible one - build a cleaner, more reliable system over weeks of use. Focus on function and safety first, then refine aesthetics as you learn how your specific setup moves.